
Hey there, fellow food lovers! If you’re like me, the mere mention of Boston Cream Pie brings back memories of that luscious chocolate glaze and creamy filling that dances on your taste buds. Now, imagine capturing that same delightful experience in a cookie form! That’s exactly what my Boston Cream Pie Cookies offer. They’re soft, chewy, and topped with a rich chocolate glaze that makes them utterly irresistible. Plus, they’re easy to make, which means you can whip them up with your little ones, just like I do with my son!
These cookies have become a staple in our household, especially during special occasions. Whether it’s a birthday celebration or a casual family gathering, they never fail to impress. Not only do they taste amazing, but they also look fabulous on any dessert table. So, roll up your sleeves, and let’s dive into this delicious recipe that will surely become a favorite in your home, too!
Why You’ll Love This Recipe
1. Easy to Make
With straightforward steps and simple ingredients, this Boston Cream Pie Cookies recipe is perfect for cooks of all skill levels. Whether you’re a kitchen novice or a seasoned pro, you’ll find these cookies easy to whip up. The best part? You can even involve your kids in the process, making it a fun family activity!
2. Deliciously Decadent
These cookies are not just good; they are downright decadent! Imagine biting into a soft cookie with a creamy filling and a glossy chocolate glaze. Each bite is a delightful explosion of flavors that transports you straight to dessert heaven. You won’t be able to stop at just one!
3. Perfect for Any Occasion
Whether it’s a casual coffee break or a festive celebration, these cookies suit any occasion. They are perfect for parties, holidays, or just a sweet treat to enjoy with your family. Their elegant appearance makes them a hit at gatherings, ensuring your dessert table stands out.
4. Customizable to Your Taste
This recipe is versatile, allowing you to make adjustments to suit your preferences. Want to add a hint of vanilla or maybe a sprinkle of nuts? Go for it! This flexibility lets you experiment and make the recipe your own.
Ingredients

Here’s what you’ll need to create these scrumptious cookies:
Full List of Ingredients
- 1 cup unsalted butter, softened
- 1 cup granulated sugar
- 2 large eggs
- 2 teaspoons vanilla extract
- 2 cups all-purpose flour
- 1 teaspoon baking powder
- 1/2 teaspoon salt
- 1 cup heavy cream
- 1 cup semi-sweet chocolate chips
- 1/2 cup powdered sugar
Step-by-Step Instructions
Step 1: Preheat Your Oven
Start by preheating your oven to 350°F (175°C). This is an important step, as it ensures your cookies bake evenly. Meanwhile, line a baking sheet with parchment paper to prevent sticking and make cleanup a breeze later on.
Step 2: Cream the Butter and Sugar
In a large mixing bowl, combine the softened butter and granulated sugar. Using an electric mixer, beat them together on medium speed until the mixture is light and fluffy, which should take about 3-5 minutes. This step is crucial because it incorporates air into the batter, leading to a soft and tender cookie.
Step 3: Add the Eggs and Vanilla
Next, add the eggs and vanilla extract to the butter-sugar mixture. Beat on medium speed until everything is well combined. The mixture should appear creamy and smooth. This is where the flavor starts to build, so don’t rush this part!
Step 4: Mix the Dry Ingredients
In a separate bowl, whisk together the flour, baking powder, and salt. Gradually add this dry mixture to the wet ingredients, mixing on low speed until just combined. Be careful not to overmix; you want your cookies to be soft and chewy, not tough!
Step 5: Chill the Dough
Cover the dough with plastic wrap and refrigerate for about 30 minutes. Chilling the dough helps prevent the cookies from spreading too much while baking, giving you that perfect, thick cookie texture. Plus, it makes the dough easier to handle.
Step 6: Bake the Cookies
Once chilled, scoop tablespoon-sized portions of the dough onto the prepared baking sheet, spacing them about 2 inches apart. Bake in your preheated oven for 10-12 minutes, or until the edges are golden brown. Your kitchen will smell absolutely heavenly! Allow the cookies to cool on the baking sheet for a few minutes before transferring them to a wire rack to cool completely.
Step 7: Prepare the Cream Filling
While the cookies cool, it’s time to make the luscious cream filling. In a medium saucepan, heat the heavy cream over medium heat until it begins to simmer. Remove it from the heat and add the powdered sugar, whisking until smooth. You can also add a splash of vanilla extract for an extra flavor boost!
Step 8: Assemble the Cookies
Once the cookies are completely cool, take one cookie and spoon a generous amount of the cream filling onto the flat side. Top it with another cookie, flat side down, and gently press them together. Repeat this process until all cookies are filled. The creamy filling adds a delightful surprise in each bite!
Step 9: Make the Chocolate Glaze
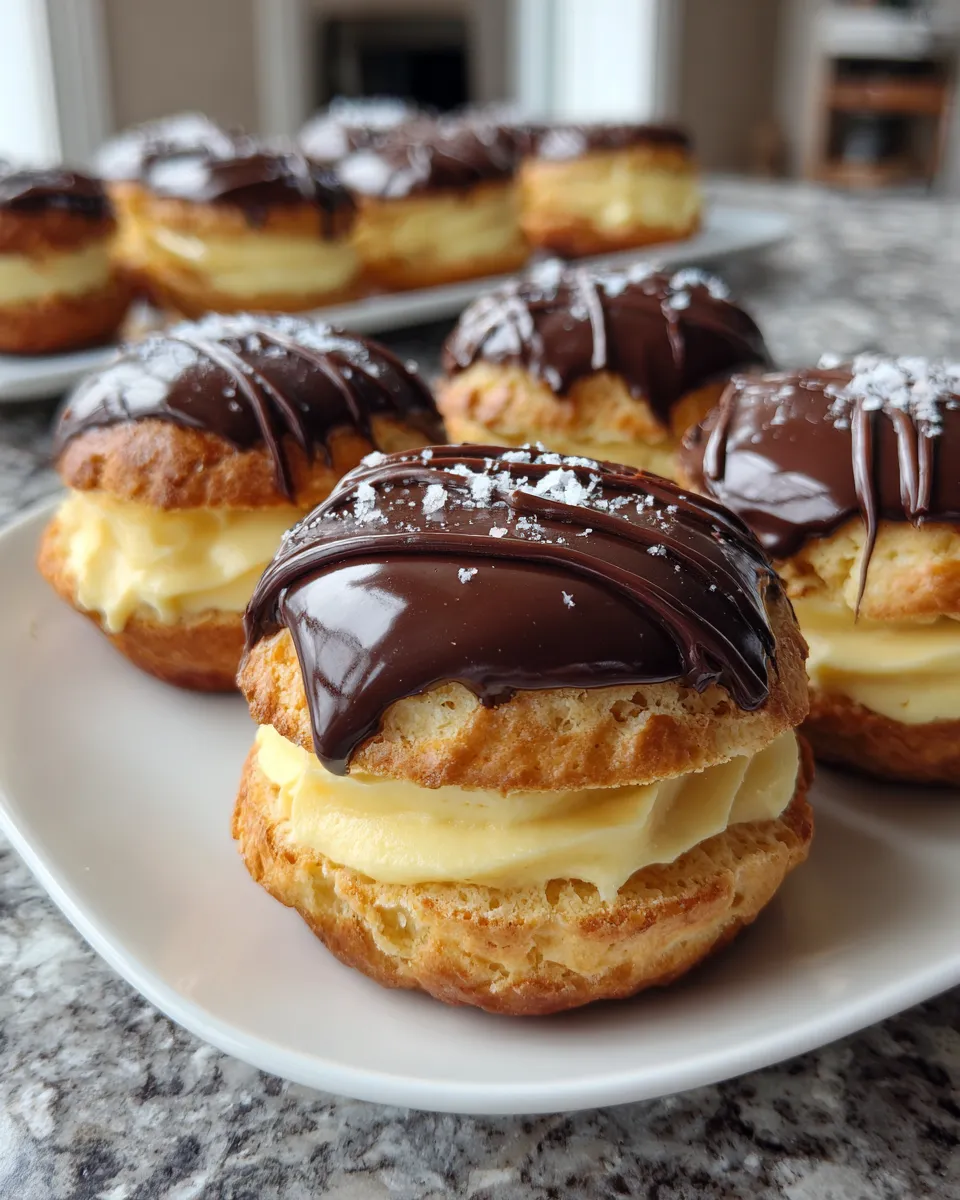
To create the chocolate glaze, melt the semi-sweet chocolate chips in a microwave-safe bowl in 30-second intervals, stirring in between until smooth. Drizzle the melted chocolate over the assembled cookies, allowing it to flow down the sides. This glossy finish not only looks beautiful but adds a rich chocolate flavor that balances the cream filling perfectly.
Step 10: Let It Set
Allow the cookies to sit for about 15-20 minutes to let the chocolate glaze set. This can be the hardest part, as the aroma will be tempting! But trust me, the wait is worth it. Once set, your Boston Cream Pie Cookies are ready to enjoy!
What to Serve with This Recipe
Suggested Pairings
These cookies pair beautifully with a variety of beverages. Consider serving them with:
- A hot cup of coffee or espresso for a delightful afternoon treat.
- A glass of cold milk, which complements the rich flavors perfectly.
- Fresh fruit, like strawberries or raspberries, to balance the sweetness.
Variations and Substitutions
1. Gluten-Free Option
If you’re looking for a gluten-free version, simply substitute all-purpose flour with a gluten-free flour blend. Just ensure the blend contains xanthan gum for the best texture!
2. Dairy-Free Alternative
For a dairy-free option, use coconut cream instead of heavy cream and dairy-free chocolate chips. This swap still delivers a creamy filling and delicious chocolate flavor.
3. Add Some Nuts
If you love a bit of crunch, consider adding chopped nuts like pecans or walnuts into the cookie dough. They add texture and a nutty flavor that pairs well with the sweet filling.
4. Flavor Variations
Feel free to experiment with different extracts in the cream filling. Almond extract can add a lovely twist, or even a splash of orange zest for a citrusy kick!
Storage Instructions
1. Room Temperature Storage
These cookies can be stored in an airtight container at room temperature for up to three days. Just be sure to keep them away from direct sunlight and heat to maintain their freshness.
2. Refrigeration
If you want to keep them longer, store the cookies in the fridge for up to a week. Just be aware that the chocolate glaze may become a bit firmer, so allow the cookies to sit at room temperature for a few minutes before serving.
Recipe Tips and Tricks
Related Recipes
If you enjoyed these Boston Cream Pie Cookies, you might also love:
- Classic Chocolate Chip Cookies
- Vanilla Cream Puffs
- Chocolate Lava Cake

Indulgent Boston Cream Pie Cookies: A Decadent Delight
Delicious Boston Cream Pie Cookies filled with creamy goodness and topped with rich chocolate glaze.
- Total Time: 1 hour
- Yield: About 24 cookies
Ingredients
- 1 cup unsalted butter, softened
- 1 cup granulated sugar
- 2 large eggs
- 2 teaspoons vanilla extract
- 2 cups all-purpose flour
- 1 teaspoon baking powder
- 1/2 teaspoon salt
- 1 cup heavy cream
- 1 cup semi-sweet chocolate chips
- 1/2 cup powdered sugar
Instructions
- Preheat oven to 350°F (175°C) and line a baking sheet with parchment paper.
- Cream together softened butter and granulated sugar until light and fluffy.
- Add eggs and vanilla extract, mix until well combined.
- In a separate bowl, whisk flour, baking powder, and salt; gradually mix into the wet ingredients.
- Chill the dough for 30 minutes covered with plastic wrap.
- Scoop tablespoon-sized dough onto the baking sheet and bake for 10-12 minutes until golden brown.
- Heat heavy cream in a saucepan, stir in powdered sugar until smooth to make the cream filling.
- Assemble cookies by filling one cookie with cream and topping with another.
- Melt chocolate chips and drizzle over assembled cookies.
- Let the cookies sit for 15-20 minutes to set the chocolate glaze before serving.
Notes
- Chilling the dough is key to prevent spreading.
- Feel free to add a splash of vanilla extract to the cream filling for extra flavor.
- Prep Time: 30 minutes
- Cook Time: 12 minutes
- Category: Dessert
- Method: Baking
- Cuisine: American
- Diet: Vegetarian
FAQs
1. Can I freeze Boston Cream Pie Cookies?
Yes! You can freeze the assembled cookies for up to three months. Just place them in an airtight container, separating layers with parchment paper.
2. How do I know when the cookies are done baking?
The cookies should have slightly golden edges and a soft center. They will continue to firm up as they cool on the baking sheet.
3. Can I use a different type of chocolate for the glaze?
Absolutely! Feel free to experiment with dark chocolate, white chocolate, or even flavored chocolate melts for a unique twist.
4. What if I don’t have heavy cream?
If you don’t have heavy cream, you can use half-and-half or make a substitute by mixing milk with butter (2 tablespoons of butter per cup of milk).
5. How can I make these cookies more festive?
For a festive touch, you can add sprinkles on top of the chocolate glaze or use colored chocolate melts for holiday-themed cookies!
Conclusion
There you have it, my delightful Boston Cream Pie Cookies! With their rich flavors and delightful textures, they are bound to become a favorite in your home. Remember, cooking should be a fun and enjoyable experience, so don’t hesitate to add your own personal flair to this recipe. I hope you create beautiful memories in the kitchen, just like I do with my family. Happy baking!