

Hey there, fellow food lovers! If you’re anything like me, you know that the kitchen can be a magical place where flavors collide and traditions blend. Today, I’m thrilled to share a recipe that perfectly embodies this fusion spirit: the Spicy Kimchi Bulgogi Cheesesteak. Imagine tender, marinated bulgogi beef sizzling in the pan, its aroma tantalizing your senses. Now, add in the unique kick of spicy kimchi and a gooey layer of melted cheese, all tucked inside a warm, crusty roll. Can you feel your mouth watering already?
As a mom who loves cooking with her son, this recipe has become a delightful favorite for our family. It’s not just about the incredible taste; it’s about the joy of creating something special together. Whether it’s a casual weeknight dinner or a gathering with friends, this Spicy Kimchi Bulgogi Cheesesteak is sure to impress. So, let’s dive into this culinary adventure and discover why you’ll love making it!
Why You’ll Love This Recipe
1. Flavor Explosion
The combination of marinated bulgogi and spicy kimchi creates a flavor explosion that will tantalize your taste buds. The savory sweetness of the beef pairs perfectly with the tangy heat of the kimchi, making every bite a delightful experience. You’ll find yourself craving this unique blend of cultures long after your meal is over!
2. Quick and Easy to Prepare
As a busy mom, I understand the importance of quick meals that don’t skimp on flavor. This recipe can be prepared in about 30 minutes, making it perfect for weeknight dinners. With just a few simple steps, you’ll have a delicious and satisfying meal on the table in no time!
3. Customizable for Everyone
One of the best aspects of the Spicy Kimchi Bulgogi Cheesesteak is its versatility. You can easily adjust the spice level by varying the amount of kimchi you use or even switching out the protein for chicken or tofu. This recipe is designed to be adaptable, ensuring that everyone at your table can enjoy it.
4. A Fun Family Cooking Experience
Cooking this recipe is a fun way to bond with your loved ones. My son often helps me in the kitchen, and he loves mixing the ingredients and assembling the sandwiches. It’s a wonderful opportunity to teach kids about cooking while enjoying quality time together.
Ingredients
Gathering the right ingredients is key to making the Spicy Kimchi Bulgogi Cheesesteak just right. Here’s what you’ll need:
Full List of Ingredients
- 1 pound bulgogi beef (thinly sliced)
- 1 cup kimchi (chopped)
- 1 tablespoon soy sauce
- 1 tablespoon sesame oil
- 1 tablespoon gochujang (Korean chili paste)
- 1 tablespoon sugar
- 1 medium onion (sliced)
- 1 bell pepper (sliced, any color)
- 4 hoagie rolls (or sandwich rolls)
- 1 ½ cups provolone cheese (sliced)
- Fresh cilantro (for garnish, optional)
- Salt and pepper (to taste)
Step-by-Step Instructions
Step 1: Prepare the Marinade
In a large bowl, combine the soy sauce, sesame oil, gochujang, and sugar. Mix well until the sugar is dissolved. This marinade will infuse the bulgogi beef with rich flavors, so make sure everything is well-combined. The aroma will already start to tantalize you!
Step 2: Marinate the Beef
Add the thinly sliced bulgogi beef to the marinade, ensuring each piece is well-coated. Cover the bowl with plastic wrap and let it marinate for at least 15 minutes. If you have more time, letting it sit for up to an hour in the fridge will deepen the flavors even further.
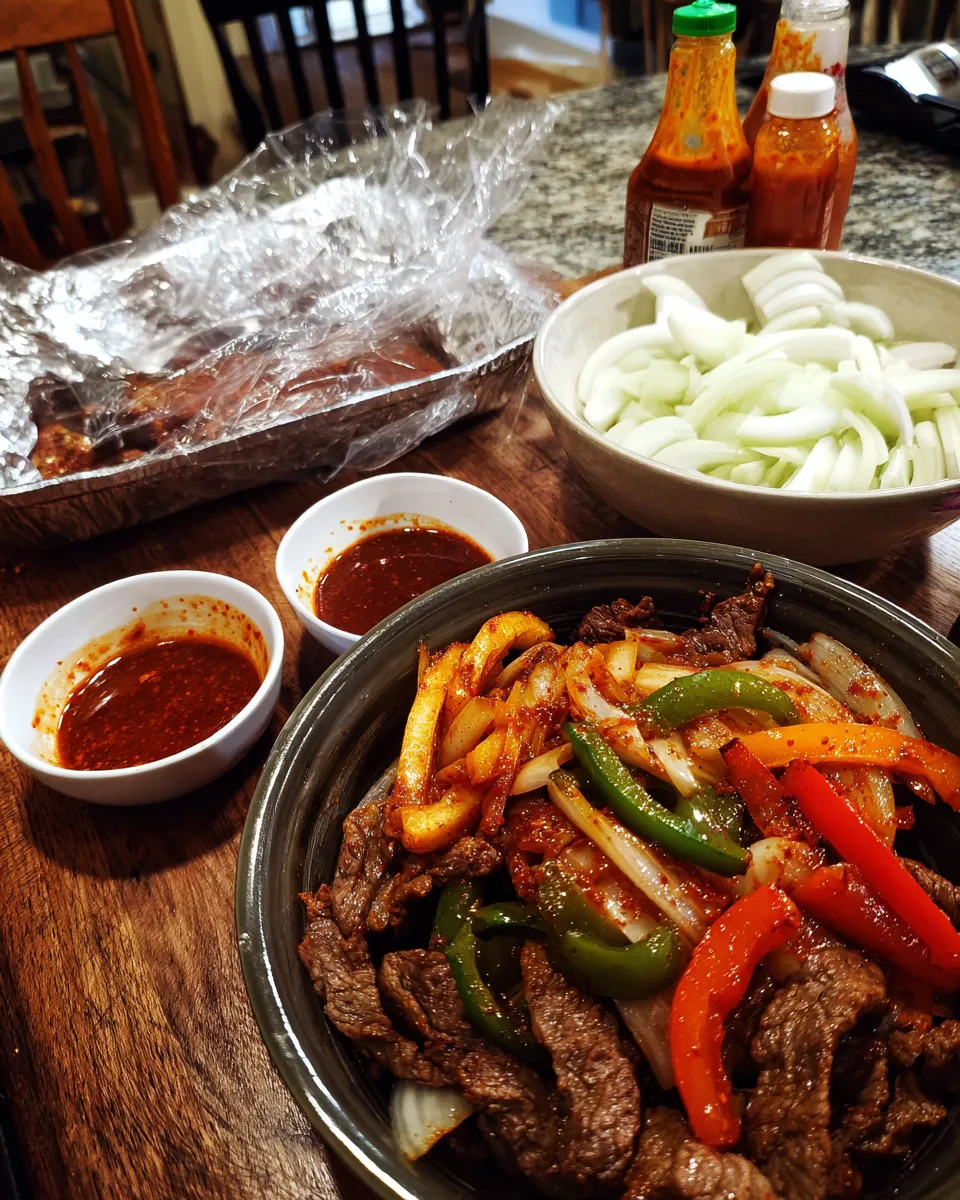
Step 3: Cook the Vegetables
In a large skillet over medium heat, add a splash of oil. Once hot, add the sliced onion and bell pepper. Sauté for about 5-7 minutes, or until they soften and become slightly caramelized. This step adds a lovely sweetness that balances the spiciness of the kimchi.
Step 4: Cook the Beef
Push the vegetables to one side of the skillet and add the marinated bulgogi beef to the empty side. Cook for about 5 minutes, stirring occasionally, until the beef is browned and cooked through. Ensure it’s well-mixed with the vegetables for that delicious fusion of flavors!
Step 5: Add the Kimchi
Once the beef is cooked, add the chopped kimchi to the skillet. Stir everything together and cook for an additional 2-3 minutes. The kimchi will heat through while releasing its tangy juices, creating a wonderful sauce that coats the beef and vegetables.
Step 6: Assemble the Cheesesteaks
Preheat your oven to 350°F (175°C). Slice the hoagie rolls lengthwise, without cutting all the way through. Fill each roll with the beef and kimchi mixture, then top generously with provolone cheese slices. This is where the magic happens—gooey, melted cheese brings everything together!
Step 7: Bake Until Golden
Place the stuffed rolls on a baking sheet and bake in the preheated oven for about 5-7 minutes, or until the cheese is melted and bubbly. Keep a close eye on them, as you want the cheese to turn golden without burning. The smell will be irresistible!
Step 8: Serve and Enjoy
Once out of the oven, garnish your cheesesteaks with fresh cilantro if desired. Serve immediately while they are still warm and melty. These sandwiches are perfect for sharing, but trust me, you might not want to!
What to Serve with This Recipe
Suggested Pairings
To complement your Spicy Kimchi Bulgogi Cheesesteak, consider serving:
- Sweet potato fries
- A side salad with sesame dressing
- Korean-style pickled vegetables
- Steamed rice or quinoa
Variations and Substitutions
1. Vegetarian Version
For a vegetarian option, substitute bulgogi beef with marinated tofu or tempeh. Use the same marinade for the tofu to achieve that rich flavor.
2. Gluten-Free Option
To make this recipe gluten-free, use gluten-free hoagie rolls and tamari sauce instead of soy sauce in the marinade.
3. Different Cheeses
Feel free to experiment with different cheeses! Cheddar or pepper jack can add a unique twist to the flavor profile.
4. Add More Veggies
Don’t hesitate to add more veggies! Mushrooms, zucchini, or spinach can enhance the nutritional value and flavor of your cheesesteak.
Storage Instructions
1. Refrigeration
If you have leftovers, allow them to cool completely before storing. Place the cheesesteaks in an airtight container and refrigerate for up to 3 days. When ready to enjoy, simply reheat in the oven.
2. Freezing
For longer storage, you can freeze the assembled cheesesteaks. Wrap each sandwich tightly in plastic wrap and then in aluminum foil. They can be frozen for up to 2 months. To reheat, bake from frozen, adding a few extra minutes to the cooking time.
Recipe Tips and Tricks
To make the most of your Spicy Kimchi Bulgogi Cheesesteak, here are a few tips:
- Don’t skip the marinating step! It’s essential for flavor.
- Experiment with different types of kimchi for varying spice levels.
- Use a meat thermometer to ensure the beef is cooked through (should reach 145°F).
Related Recipes
If you enjoyed this recipe, you might also like:
- Sweet and Spicy Korean Meatballs
- Teriyaki Chicken Stir-Fry
- Korean BBQ Chicken Tacos

Spicy Kimchi Bulgogi Cheesesteak: Mouth-Watering Fusion Delight
A delicious fusion of bulgogi beef and kimchi in a cheesy hoagie roll, perfect for a spicy twist on a classic cheesesteak.
- Total Time: 35 minutes
- Yield: 4 servings 1x
Ingredients
- 1 pound bulgogi beef (thinly sliced)
- 1 cup kimchi (chopped)
- 1 tablespoon soy sauce
- 1 tablespoon sesame oil
- 1 tablespoon gochujang (Korean chili paste)
- 1 tablespoon sugar
- 1 medium onion (sliced)
- 1 bell pepper (sliced, any color)
- 4 hoagie rolls (or sandwich rolls)
- 1 ½ cups provolone cheese (sliced)
- Fresh cilantro (for garnish, optional)
- Salt and pepper (to taste)
Instructions
- Mix soy sauce, sesame oil, gochujang, and sugar in a bowl to prepare the marinade.
- Add bulgogi beef to the marinade and let it sit for at least 15 minutes.
- Sauté sliced onion and bell pepper in a skillet until softened.
- Add marinated beef to the skillet and cook until browned.
- Stir in chopped kimchi and cook for an additional 2-3 minutes.
- Preheat oven to 350°F (175°C) and slice hoagie rolls.
- Fill rolls with beef and kimchi mixture, top with provolone cheese.
- Bake for 5-7 minutes until cheese is melted and golden, then serve warm.
Notes
- For deeper flavor, marinate the beef for up to an hour.
- Adjust the amount of gochujang to control the spice level.
- Prep Time: 20 minutes
- Cook Time: 15 minutes
- Category: Sandwich
- Method: Baking, Sautéing
- Cuisine: Korean-American
- Diet: Non-Vegetarian
Nutrition
- Serving Size: 1 sandwich
- Calories: 550
- Sugar: 6g
- Sodium: 800mg
- Fat: 25g
- Saturated Fat: 10g
- Unsaturated Fat: 15g
- Trans Fat: 0g
- Carbohydrates: 50g
- Fiber: 3g
- Protein: 30g
- Cholesterol: 90mg
FAQs
What is bulgogi?
Bulgogi is a Korean dish made from marinated beef that is grilled or stir-fried. It’s known for its sweet and savory flavor.
Can I use another type of meat?
Yes! You can substitute bulgogi beef with chicken, pork, or even shrimp for a different twist.
How spicy is this recipe?
The spice level can be adjusted by using more or less kimchi and gochujang. Start with a small amount if you’re sensitive to heat.
Can I make this recipe ahead of time?
Absolutely! You can marinate the beef and chop the vegetables a day in advance. Just assemble and cook before serving.
What can I use instead of hoagie rolls?
If you don’t have hoagie rolls, any soft sandwich bread or even lettuce wraps can work as a substitute.
Conclusion
There you have it! The Spicy Kimchi Bulgogi Cheesesteak is not just a meal; it’s an experience filled with flavor, fun, and connection. Whether you’re cooking for your family or hosting friends, this dish will surely impress. Remember, cooking should be enjoyable, so don’t stress! Dive into the kitchen, have fun, and create unforgettable memories over this delicious fusion delight. Happy cooking!