

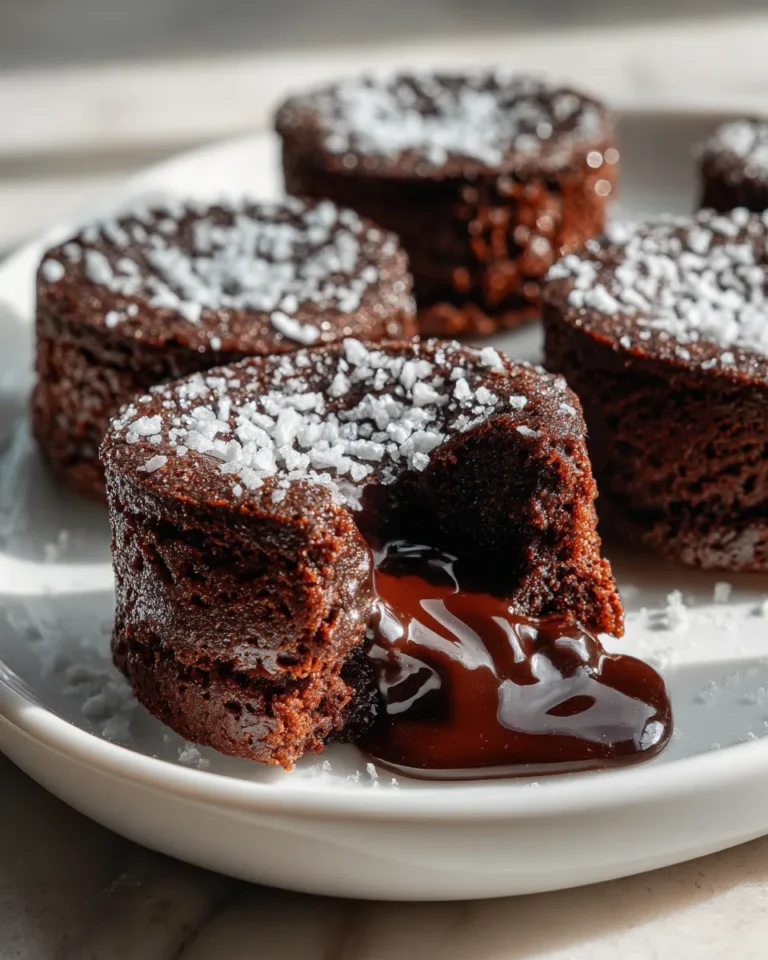
Hey there! Have you ever experienced the moment when you cut into a brownie and warm, gooey chocolate flows out like a delicious lava flow? That’s the magic of chocolate lava brownie cakes! As a mom who loves to create unforgettable memories in the kitchen with my son, these delightful treats have become a favorite in our household. They are not just desserts; they are little moments of joy that we share as a family, making our baking adventures all the more special.
Imagine the rich aroma of chocolate filling your kitchen, enticing everyone to gather around as you prepare these luscious brownie cakes. The joy of watching my son’s eyes light up when he sees that chocolate oozing out is priceless. Today, I’m excited to share a recipe that’s simple to follow, yet utterly indulgent. Whether it’s a cozy family evening or a festive gathering, these chocolate lava brownie cakes are sure to impress and satisfy your sweet tooth!
Why You’ll Love This Recipe
Decadent Chocolate Delight
First and foremost, these chocolate lava brownie cakes are the epitome of decadence. The rich, fudgy texture pairs perfectly with the molten chocolate center. You get the best of both worlds with a brownie that’s crispy on the outside and gooey on the inside. Each bite is a burst of chocolatey goodness that melts in your mouth!
Easy to Make
Even if you’re new to baking, you’ll find this recipe approachable and straightforward. With just a handful of ingredients and simple steps, you’ll be whipping up these cakes in no time. I promise, you won’t need a culinary degree to get these right! Plus, they bake quickly, making them a fantastic option for those last-minute dessert cravings.
Perfect for Any Occasion
Whether it’s a birthday celebration, a holiday dinner, or just a regular Tuesday night, these chocolate lava brownie cakes fit right in. They can be dressed up with ice cream or fresh berries for a fancy dessert or enjoyed plain for a quick treat. Their versatility makes them a staple in our family’s dessert repertoire!
Kid-Friendly Fun
One of the best parts of making these cakes is that kids love to help! My son enjoys stirring the batter and pouring it into the ramekins. Baking together not only creates delicious treats but also strengthens our bond. Plus, who doesn’t want a mini chef in the kitchen? It’s a win-win for everyone involved!
Ingredients

Before diving into the baking, let’s gather our ingredients. Here’s what you’ll need to create these chocolatey delights!
Full List of Ingredients
- 1 cup semisweet chocolate chips
- 1/2 cup unsalted butter
- 1 cup powdered sugar
- 2 large eggs
- 2 large egg yolks
- 1 teaspoon vanilla extract
- 1/2 cup all-purpose flour
- 1/4 teaspoon salt
- Cooking spray (for greasing ramekins)
Step-by-Step Instructions
Step 1: Preheat Your Oven
Start by preheating your oven to 425°F (220°C). This is crucial because you want your brownie cakes to bake perfectly, with a molten center. While the oven heats, you can prepare your ramekins.
Step 2: Prepare the Ramekins
Lightly grease four 6-ounce ramekins with cooking spray. This prevents the brownie cakes from sticking, allowing them to release easily once baked. You want a nice, clean presentation when you serve these delicious desserts!
Step 3: Melt Chocolate and Butter
In a microwave-safe bowl, combine the semisweet chocolate chips and unsalted butter. Microwave in 30-second intervals, stirring in between, until completely melted and smooth. This should take about 1-2 minutes. The mixture will be glossy and have a rich aroma—can’t you just smell it?
Step 4: Mix in Sugar
Once your chocolate and butter are melted, whisk in the powdered sugar until well combined. The mixture will be thick and slightly grainy. This step is essential as it sweetens your batter, creating that delectable flavor balance.
Step 5: Add Eggs and Vanilla
Next, add the eggs and egg yolks to the mixture, followed by the vanilla extract. Whisk vigorously until everything is well blended. The batter should become smooth and shiny, which indicates that you’ve incorporated enough air for a lovely rise during baking.
Step 6: Fold in Dry Ingredients
Now it’s time to gently fold in the all-purpose flour and salt. Use a spatula to combine the dry ingredients with the wet ingredients, being careful not to overmix. You want to keep that fluffy texture while ensuring there are no lumps. This step is what makes your brownie cakes light yet fudgy!
Step 7: Pour Batter into Ramekins
Divide the batter evenly among the prepared ramekins, filling each about 2/3 of the way full. This allows room for the cakes to rise without spilling over. The thick batter should sit nicely in the ramekins, waiting to transform into chocolatey goodness.
Step 8: Bake to Perfection
Place the ramekins on a baking sheet and bake in your preheated oven for 12-14 minutes. You want the edges to be firm but the center to still jiggle slightly. This is the secret to achieving that molten center! When you pull them out, the aroma will be intoxicating, filling your kitchen with chocolate bliss.
Step 9: Let Them Rest
Once baked, take the ramekins out of the oven and let them rest for 1 minute. This allows the cakes to set slightly, making them easier to unmold. You’ll want to be patient here; I know it’s tempting to dig in right away!
Step 10: Serve and Enjoy!
To serve, carefully invert each ramekin onto a plate. Give it a gentle shake to release the brownie cake. It should slide out smoothly, revealing that luscious molten center. Top with a scoop of vanilla ice cream or fresh berries for an extra touch. Enjoy every gooey bite!
What to Serve with This Recipe
Suggested Pairings
These chocolate lava brownie cakes are delicious on their own, but they pair beautifully with a variety of accompaniments. Here are some ideas:
- Vanilla ice cream
- Fresh berries (strawberries or raspberries)
- Whipped cream
- Chocolate sauce drizzle
- Caramel sauce for a sweet twist
Variations and Substitutions
Nutty Brownie Lava Cakes
Add a handful of chopped nuts, such as walnuts or pecans, to the batter for added texture and flavor. The nutty crunch complements the chocolate beautifully!
Gluten-Free Option
To make these brownie cakes gluten-free, substitute all-purpose flour with a gluten-free flour blend. Ensure that your chocolate chips are also gluten-free!
Mint Chocolate Lava Cakes
If you’re a fan of mint chocolate, add a few drops of peppermint extract to the batter. This will infuse your cakes with a refreshing minty flavor that pairs wonderfully with the chocolate.
White Chocolate Lava Center
For a fun twist, replace the semisweet chocolate chips with white chocolate chips for the center. It creates an entirely different, yet equally delicious, chocolate experience!
Storage Instructions
Storing Leftovers
If you happen to have leftovers (though I doubt it!), store them in an airtight container in the refrigerator for up to 2 days. The cakes will keep their deliciousness, but the molten center may firm up slightly.
Freezing for Later
To freeze, wrap each cooled lava cake tightly in plastic wrap and then place them in a freezer-safe bag. They can be frozen for up to a month. When you’re ready to enjoy, thaw in the fridge overnight and reheat in the microwave for about 20-30 seconds.
Recipe Tips and Tricks
Related Recipes
If you love these chocolate lava brownie cakes, you might also enjoy:
- Classic Fudge Brownies
- Chocolate Chip Cookie Dough Brownies
- Red Velvet Lava Cakes
- Peanut Butter Cup Brownies
Indulge in Decadent Chocolate Lava Brownie Cakes
Indulge in these rich and gooey chocolate brownie cakes with a molten center, perfect for dessert lovers.
- Total Time: 29 minutes
- Yield: 4 servings
Ingredients
- 1 cup semisweet chocolate chips
- 1/2 cup unsalted butter
- 1 cup powdered sugar
- 2 large eggs
- 2 large egg yolks
- 1 teaspoon vanilla extract
- 1/2 cup all-purpose flour
- 1/4 teaspoon salt
- Cooking spray (for greasing ramekins)
Instructions
- Preheat your oven to 425°F (220°C).
- Grease four 6-ounce ramekins with cooking spray.
- Melt chocolate chips and butter in a microwave-safe bowl.
- Whisk in powdered sugar until combined.
- Add eggs, egg yolks, and vanilla, whisking until smooth.
- Fold in flour and salt gently until just combined.
- Pour batter into ramekins, filling them 2/3 full.
- Bake for 12-14 minutes until edges are firm and center jiggles slightly.
- Let rest for 1 minute after baking.
- Invert ramekins onto plates to serve and enjoy!
Notes
- Serve with vanilla ice cream or fresh berries for added flavor.
- Prep Time: 15 minutes
- Cook Time: 14 minutes
- Category: Dessert
- Method: Baking
- Cuisine: American
- Diet: Vegetarian
FAQs
Can I make these lava cakes ahead of time?
Yes! You can prepare the batter and store it in the fridge for up to 24 hours before baking. Just remember to bring it to room temperature before baking.
Why did my lava cakes not ooze?
Overbaking is often the culprit. Keep an eye on them in the oven, and ensure you pull them out when the centers are still slightly jiggly!
Can I use a different type of chocolate?
Absolutely! You can use dark chocolate or even white chocolate. Just adjust the sweetness according to your preference.
How do I know when the cakes are done?
The edges should be firm, while the center should still jiggle slightly when you shake the ramekin. This will ensure a gooey center!
What if I don’t have ramekins?
If you don’t have ramekins, you can use a muffin tin. Just adjust the baking time, as they may cook faster!
Conclusion
Indulging in decadent chocolate lava brownie cakes is not just about satisfying your sweet tooth; it’s about creating lasting memories in the kitchen with loved ones. These cakes are perfect for any occasion and are incredibly easy to make, even for novice bakers. I hope you try this recipe and enjoy the delightful experience of tasting that warm, molten chocolate center. Happy baking, and may your kitchen be filled with love and laughter!