
Introduction
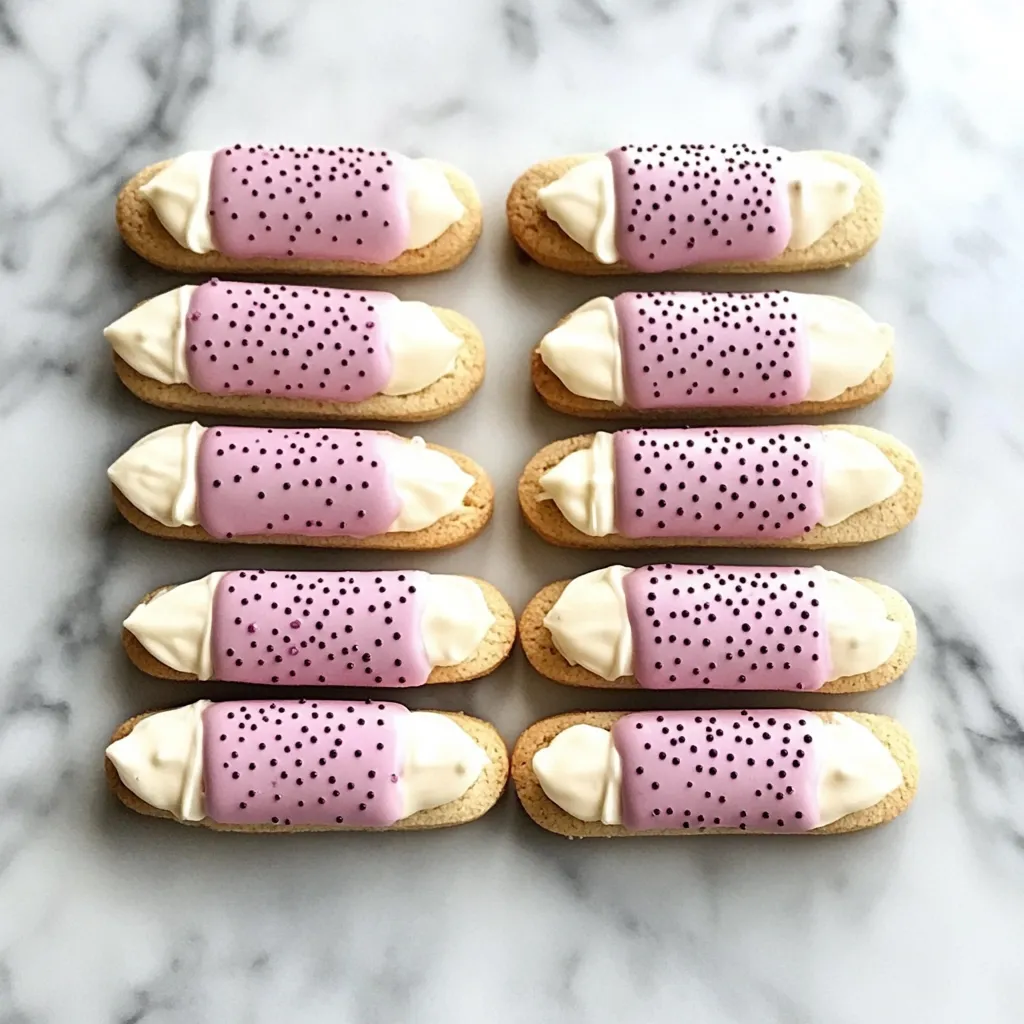
If you’re looking for a delightful treat to brighten your day, then cute wafer pencil cookies are a charming choice! These cookies not only look adorable, but they also taste fantastic. Imagine serving these whimsical delights at a birthday party or a casual get-together. Everyone will love their unique shape and irresistible flavor!
Ingredients
Before we dive into the fun part, let’s gather our ingredients. Here’s what you will need:
- 1 cup unsalted butter, softened
- 1 cup granulated sugar
- 1 large egg
- 1 teaspoon vanilla extract
- 2 cups all-purpose flour
- 1 teaspoon baking powder
- 1/2 teaspoon salt
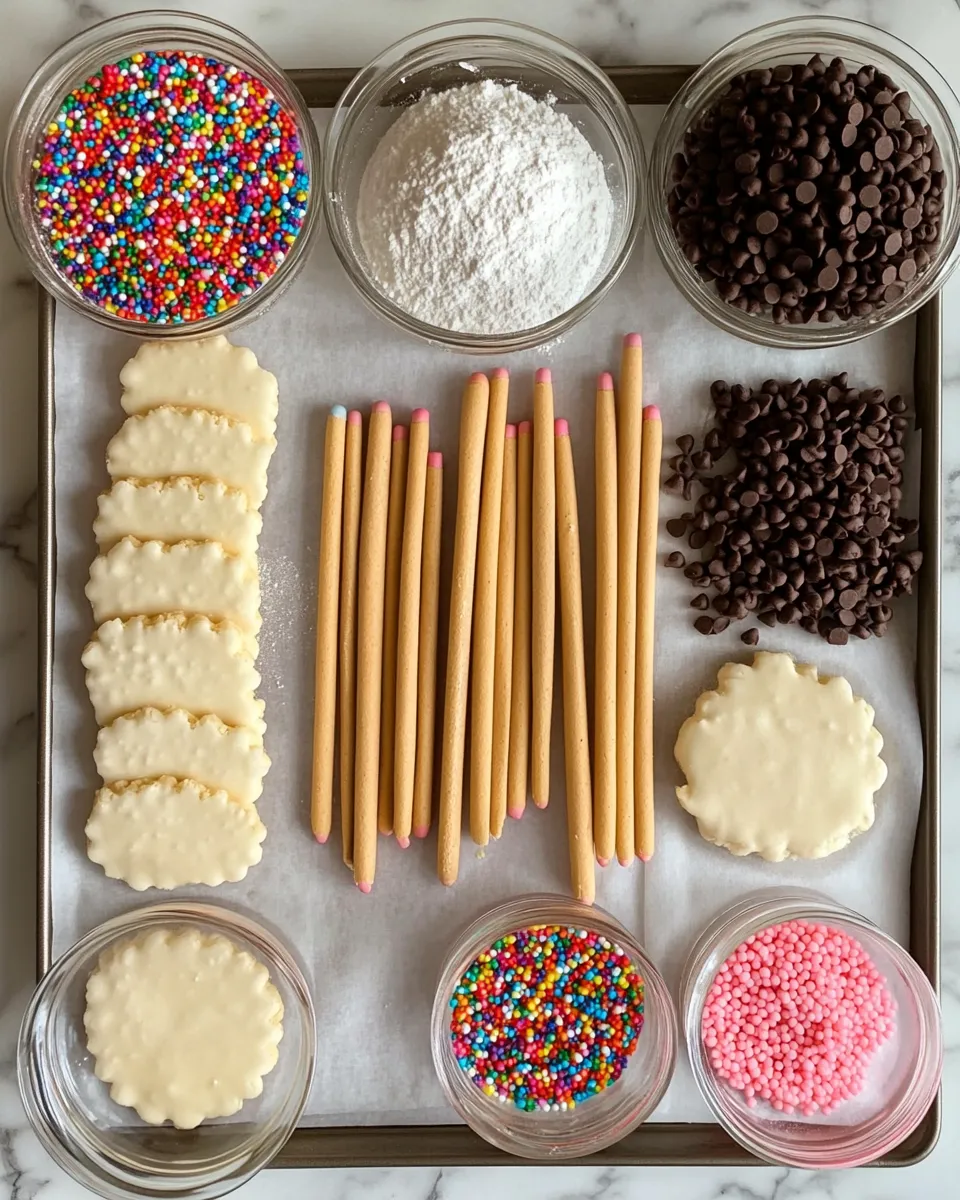
- Food coloring (optional)
- Chocolate chips or sprinkles for decoration
With these simple ingredients, you’ll be well on your way to creating something magical!
Timing
Timing is crucial for any recipe. Here’s a quick breakdown:
- Preparation time: 20 minutes
- Chilling time: 30 minutes
- Baking time: 12-15 minutes
- Total time: Approximately 1 hour
These cookies are quick to make, which is perfect when you have a craving for something sweet!
Step-by-Step Instructions
Let’s get into the fun part—making the cookies! Follow these steps carefully:
Step 1: Cream the Butter and Sugar
In a large bowl, cream together the softened butter and granulated sugar. Use an electric mixer for about 2-3 minutes. This step is crucial because it adds air to the mixture, resulting in fluffy cookies!
Step 2: Add the Egg and Vanilla
Next, add the egg and vanilla extract. Mix until well combined. The mixture should become smooth and creamy.
Step 3: Combine Dry Ingredients
In another bowl, whisk together the flour, baking powder, and salt. Gradually add this to the wet mixture. Stir until just combined. Don’t overmix; we want our cookies to be light and airy!
Step 4: Chill the Dough
Wrap the dough in plastic wrap and chill it in the refrigerator for about 30 minutes. Chilling is key because it helps the cookies hold their shape while baking.
Step 5: Shape the Cookies
Once chilled, preheat your oven to 350°F (175°C). Roll out the dough on a floured surface. Use a knife or cookie cutter to cut the dough into pencil shapes. Place them on a baking sheet lined with parchment paper.
Step 6: Add Decorations
Before baking, feel free to decorate your cookies with chocolate chips or colorful sprinkles. This is where the fun really begins!
Step 7: Bake the Cookies
Bake in the preheated oven for 12-15 minutes. The edges should be lightly golden. Remember, every oven is different, so keep an eye on them!
Step 8: Cool and Enjoy!
Once baked, let the cookies cool on the baking sheet for about 5 minutes before transferring them to a wire rack. Enjoy your delightful cute wafer pencil cookies with a glass of milk or your favorite beverage!
Nutritional Information
Curious about the nutritional content? Here’s a quick rundown per cookie (assuming a batch of 24):
- Calories: 120
- Fat: 7g
- Carbohydrates: 13g
- Protein: 1g
- Sugar: 5g
Keep in mind that these values can vary based on the ingredients you use, especially if you opt for healthier alternatives.
Healthier Alternatives
If you want to lighten up your cute wafer pencil cookies, consider these alternatives:
- Swap butter for coconut oil or applesauce.
- Use whole wheat flour instead of all-purpose flour.
- Reduce the sugar or use a natural sweetener like honey or agave syrup.
- Add oats or nuts for extra fiber and nutrients.
These swaps can make your cookies a bit healthier without sacrificing flavor!
Serving Suggestions
Now that your cookies are ready, how should you serve them? Here are some fun ideas:
- Stack them up on a colorful plate for a festive look.
- Serve with a side of ice cream for a delicious sundae.
- Use them as cake toppers for a whimsical touch.
- Package them in cute boxes as party favors.
Your imagination is the limit!
Common Mistakes to Avoid
Even the best bakers make mistakes. Here are some common pitfalls to watch out for:
- Not chilling the dough long enough. This can lead to flat cookies.
- Overmixing the dough. This can make your cookies tough.
- Baking at the wrong temperature. Always preheat your oven!
- Skipping the parchment paper. This helps prevent sticking.
By avoiding these mistakes, you’ll ensure your cookies come out perfectly every time!
Storage Tips
Want to keep your cookies fresh? Here’s how:
- Store in an airtight container at room temperature for up to a week.
- For longer storage, freeze in a zip-top bag for up to three months.
- Separate layers with parchment paper to prevent sticking.
These tips will help preserve their delightful charm!
Conclusion
In conclusion, cute wafer pencil cookies are a fun and easy treat to make. They’re perfect for any occasion, and the smiles they bring are priceless. Whether you’re baking for a party or a cozy night in, these cookies will surely be a hit. Get your ingredients ready and start baking!
Print
Whimsical Delights: Unleashing the Charm of Cute Wafer Pencil Cookies
These cute wafer pencil cookies are perfect for any occasion and are fun to make!
- Total Time: 1 hour
- Yield: 24 cookies
Ingredients
- 1 cup unsalted butter, softened
- 1 cup granulated sugar
- 1 large egg
- 1 teaspoon vanilla extract
- 2 cups all-purpose flour
- 1 teaspoon baking powder
- 1/2 teaspoon salt
- Food coloring (optional)
- Chocolate chips or sprinkles for decoration
Instructions
- Cream the softened butter and sugar together for 2-3 minutes.
- Add the egg and vanilla extract, mixing until smooth.
- In another bowl, whisk together flour, baking powder, and salt, then gradually add to the wet mixture.
- Wrap the dough in plastic wrap and chill in the refrigerator for 30 minutes.
- Preheat the oven to 350°F (175°C) and roll out the chilled dough, cutting it into pencil shapes.
- Decorate with chocolate chips or sprinkles before baking.
- Bake for 12-15 minutes until edges are lightly golden.
- Cool on the baking sheet for 5 minutes before transferring to a wire rack.
Notes
- Chilling the dough helps the cookies hold their shape.
- Adjust baking time based on your oven’s performance.
- Prep Time: 15 minutes
- Cook Time: 15 minutes
- Category: Dessert
- Method: Baking
- Cuisine: American
- Diet: Vegetarian
FAQs
Can I use gluten-free flour for these cookies?
Yes, you can! Just make sure to use a gluten-free flour blend that works well in baking.
What can I use instead of eggs?
You can substitute eggs with applesauce, mashed bananas, or a flaxseed mixture (1 tablespoon ground flaxseed mixed with 2.5 tablespoons water).
How can I make these cookies more colorful?
Adding food coloring to the dough before shaping the cookies is a great way to make them pop with color!
Can I add flavors to these cookies?
Absolutely! Consider adding almond extract, lemon zest, or even cocoa powder for a chocolate version.
Final Thoughts
Now that you’ve mastered the art of making cute wafer pencil cookies, let your creativity flow. Experiment with flavors, shapes, and decorations to make them uniquely yours! Happy baking!